

Updated August 2026 · 10-min read · by the Brainrich Kids team
There are two ways to set up a homeschool room. The first is to spend three weekends and a Pinterest board building a beautiful space, then discover in September which half of it your child actually uses. The second is to work a checklist, in order, and let function lead. This article is the checklist. It comes from the same place all our guides do: hundreds of conversations with homeschooling families about what earned its spot in the room, and what got quietly dragged to the garage by October.
The quick answer: a homeschool room setup is ten decisions made in the right order: audit the space, assign zones, solve seating, close the storage, fix the light, build the movement zone, hang the walls, park the tech, systematize supplies, and run a first-week test before you buy anything else. The order matters because early decisions constrain late ones: zones before furniture, furniture before decoration. Most families can complete steps 1–9 in one weekend, and the movement zone, the step schools solve with a gym and a recess bell, is the one most home setups forget entirely.
Jump to: 1. Audit · 2. Zones · 3. Seating · 4. Storage · 5. Lighting · 6. Movement · 7. Walls · 8. Tech · 9. Supplies · 10. The test · Summary checklist · Budget tiers · FAQ
The ten steps, in order
One note before step 1: "room" is shorthand. Everything below works for a corner of the living room or a shared bedroom just as well as for a spare room; if your square footage is the constraint, read this alongside our small-space homeschooling guide, which adapts every step to apartments and shared rooms. And if you want inspiration before process, start with 25 homeschool room ideas that actually get used, then come back here to build yours.
Step 1: Audit the space you actually have
Before furniture, take twenty minutes with a notepad and answer five questions about the candidate space: Where is the natural light, and at what time of day? Where are the outlets? What does this room have to keep doing (guest bed, dining, TV nights)? What is the ceiling height and which walls are free? And who else passes through here between 9 and 2?
The audit exists to prevent the classic setup mistake: designing for an empty room instead of the room you have. A desk placed before you know where the glare lands at 10 a.m. gets moved in week two. Measure twice, buy once applies to rooms, not just lumber. Write down the room's fixed facts, and let every later step obey them.
Step 2: Assign the four zones
A functioning homeschool space is four zones, whether they occupy four corners of one room or four spots around a home: a focus zone (work surface, good light), a storage zone (closable, one location), a quiet zone (soft, bounded, for reading and cooling down), and a movement zone (a dedicated place to climb, hang, and burn energy between lessons). Zones are the load-bearing decision of the entire setup: they decide where furniture goes, they give the school day its vocabulary ("desk time," "gym break," "reading corner"), and they let one room serve four functions without becoming chaos.
Mark them physically, even crudely: a rug under the focus zone, a mat under the movement zone. Children respect boundaries they can see.
Step 3: Solve seating and the work surface
The work surface question is simpler than the catalog implies. A child needs a surface at elbow height, a chair where feet reach floor or a footrest, and enough clear top for an open book plus a workbook. That is the whole spec. A kitchen table with a bench cushion meets it; so does a $40 desk; so does a fold-down wall desk.
Two decisions worth actual thought: adjustable beats perfect, because the child sitting at it will be two inches taller by June, and one surface per simultaneous worker, not per child. Siblings on staggered schedules share one desk happily; siblings forced to work side-by-side at identical desks generally do not. And accept now that some children do their best work standing, kneeling on the chair, or sprawled on the floor with a clipboard. The seating is an offer, not a sentence.
Step 4: Set up storage that closes
The storage rule for a home that is also a school: everything school-related lives in one closable place: a cabinet with doors, a rolling cart that docks in a closet, numbered workbox drawers. Open shelving photographs beautifully and degrades into visual noise by November; doors and drawers forgive a messy Tuesday.
Closing the storage is also how the school day ends. The cabinet shuts, the cart rolls away, and the room goes back to being part of the house, a boundary that protects the family's evenings and the parent's sanity in equal measure. Keep only the current quarter's materials in the room; the rest waits in a labeled bin somewhere high or under-bed.
Step 5: Fix the lighting
Lighting is the cheapest upgrade on this list and the most skipped. The order of operations: put the focus zone beside the window rather than facing it (glare) or backing it (shadow on the page); add one warm task lamp at the desk for gray mornings; and put a clip light or small lamp in the quiet zone so reading has its own pool of light. If the only available room is a basement or a north-facing one, a pair of bright, warm-toned floor lamps changes how long anyone, parent included, is willing to work there. Dim rooms get abandoned by February; it is that mechanical.
Step 6: Build the movement zone (the step schools never skip)
Walk through any school and count the infrastructure devoted to movement: the gym, the playground, the field, the recess bell that rings twice a day. Schools do not treat movement as a break from learning; they build it into the timetable, because children who move focus better when they sit back down. The research agrees: classroom studies associate short physical-activity breaks with improved attention and on-task behavior (Watson et al., 2017 systematic review), and the CDC recommends at least 60 minutes of daily physical activity for ages 6–17. A homeschool room setup that stops at desk-storage-lamp has rebuilt the classroom and forgotten the rest of the school.
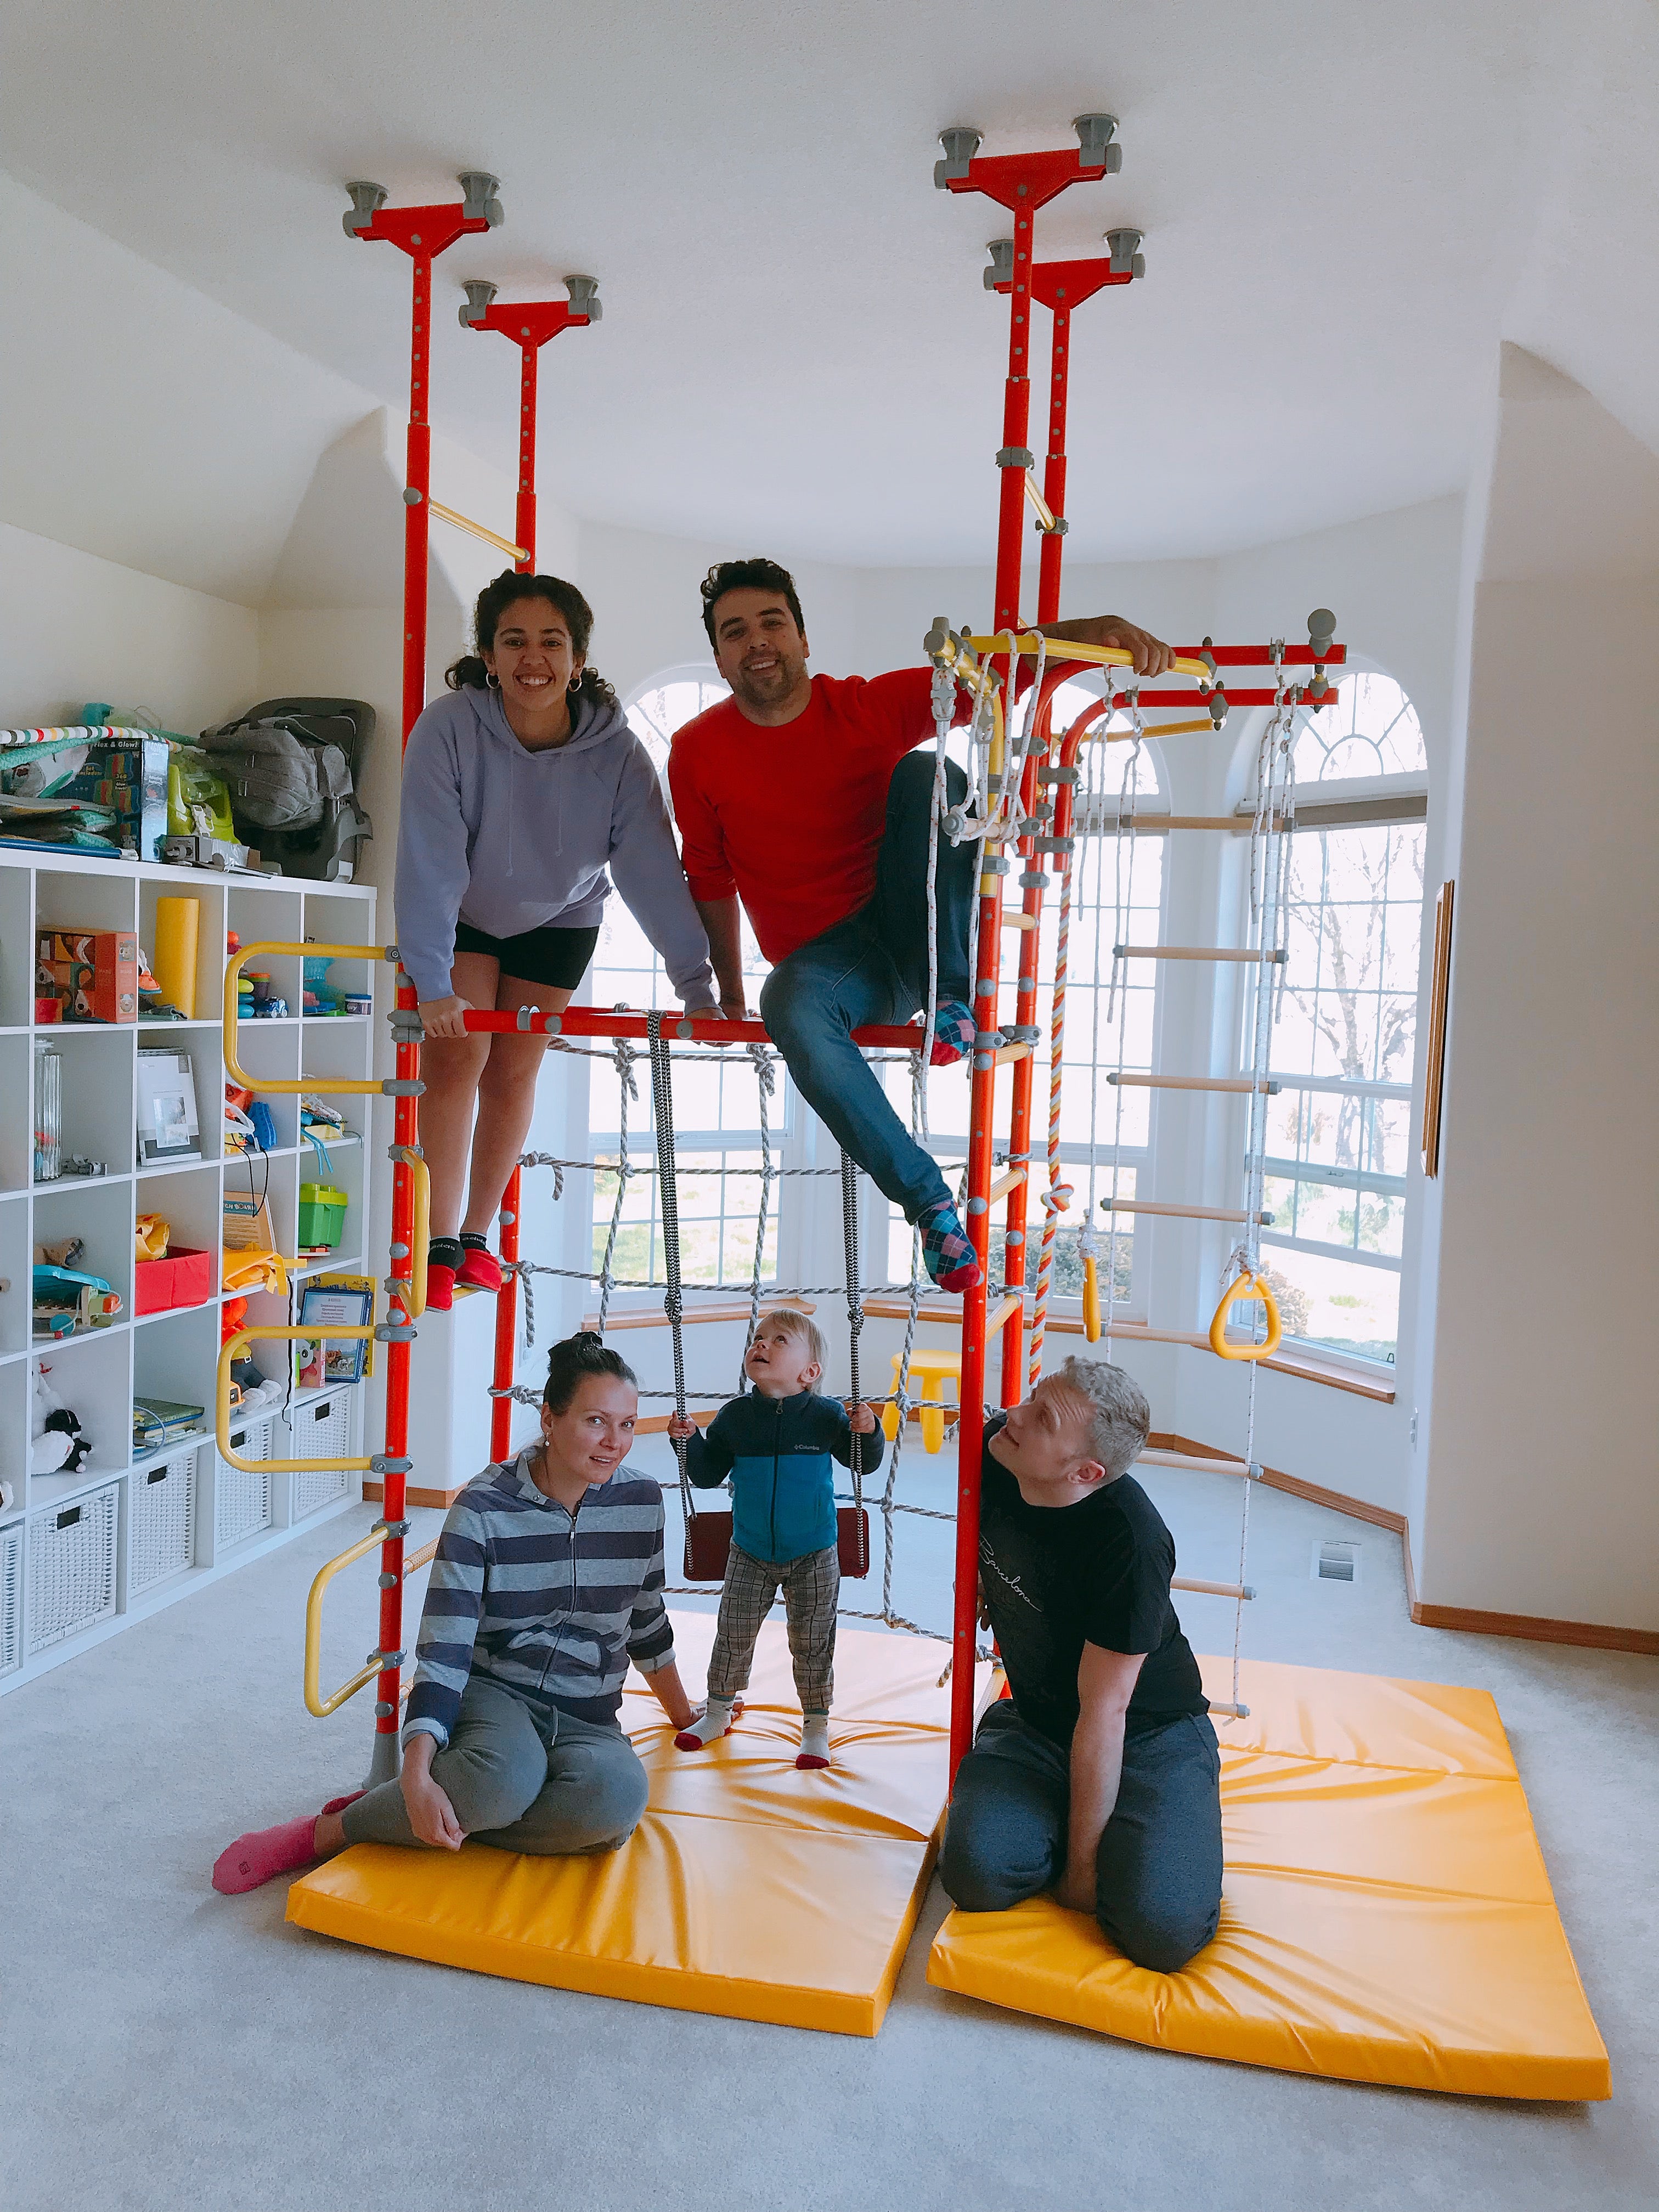
The movement zone is a dedicated spot where hard movement is always allowed, no setup, no weather, no drive. The space-efficient way to build one is vertical: a floor-to-ceiling gym like our compact Model T3 braces on a pressure-fit steel frame (no drilling, renter-safe) and stacks climbing, swinging, and hanging into about an armchair's footprint. Ten minutes on it between math and reading is the home equivalent of the recess bell, and it needs no daylight, which matters most in January.
Safety spec, non-negotiable: impact mats under the climbing and landing areas, clearance between the gym and furniture edges (respect the swing arc), independent climbing from age 3+, adult nearby. None of this replaces the park and the bike, and it should not; it covers the twenty school-day breaks a week the park cannot. For the deeper dives: Homeschool PE at Home for turning the zone into an actual PE program, our ADHD homeschooling guide if movement is your child's operating system, and the sensory gym guide for swings and vestibular input.


Which gym fits your room? Take the 60-Second Quiz →
Step 7: Hang the walls (display, not decoration)
The wall rule: display beats decoration. Instead of laminated classroom posters, hang one wire or rail where the current week's work gets clipped up, one map or one poster tied to what you are studying right now, and a calendar at the child's eye height, not yours. Rotate everything monthly. A wall the child's own work keeps appearing on says your work matters here; a wall of permanent posters becomes invisible by week three. Leave at least one wall calm and bare, especially near the quiet zone; visual rest is part of the design. (For the aesthetics-first version of this conversation, our playroom ideas guide covers walls, color, and layout in a family space.)
Step 8: Park the tech
Whatever your screen philosophy, the setup principle is the same: tech gets a parking spot, not a roaming pass. One charging station in the storage zone where tablets and headphones live when not in use; screen-based lessons happen at the focus zone like any other lesson; and the charging spot sits where a passing adult can see the screen. The point is not surveillance, it is default-off: a tablet that lives in a drawer is a tool you take out, while a tablet that lives on the desk is the desk's main event. Headphones per child if audio lessons overlap, and one power strip mounted off the floor spares you the daily cable puddle.
Step 9: Systematize the supplies
The difference between a room that runs and a room that leaks time is supply logistics. Three systems close the gap: a daily caddy (one carrier with the pencils, scissors, glue, and crayons that travel to wherever work happens, restocked Friday), a library system (one bin or shelf spot where library books live, full stop, because the fine is real and the lost-book hunt is realer), and a finished-work flow (an in-tray the child can reach; once a week the best piece goes on the Step 7 wall, a keeper goes to a memory box, and the rest recycles guilt-free). None of this costs more than $30 and it buys back ten minutes of every school day.
Step 10: Run the first-week test
Here is the step that separates this checklist from a shopping list: the room is not finished when it is furnished, it is finished after it survives contact with a real week. Run five school days in the new space and change nothing. Watch: Where does your child actually settle to work? Which storage gets used and which gets bypassed? When does focus break down, and does the movement zone catch it? Where do the pencils end up? What do you keep walking across the room for?
Then make your adjustments all at once, on the weekend, and only the ones the week demanded. The room's job is to fit your child, not the photo. A homeschool room is a hypothesis; the first week is the experiment. Save the decorating budget until after the data is in.
The whole setup on one card
🗒️ HOMESCHOOL ROOM SETUP: THE 10-STEP CHECKLIST
☐ 1. Audit: light, outlets, ceiling, free walls, the room's other jobs
☐ 2. Zones: focus · storage · quiet · movement, marked visibly
☐ 3. Seating: elbow-height surface, feet supported, adjustable beats perfect
☐ 4. Storage: one closable home for everything school; current quarter only
☐ 5. Lighting: desk beside the window, task lamp, reading light
☐ 6. Movement zone: vertical gym or ladder, mats, clearance, age 3+ rules
☐ 7. Walls: rotating display rail, child-height calendar, one calm wall
☐ 8. Tech: one visible charging spot; screens work at the desk, live in the drawer
☐ 9. Supplies: daily caddy, library bin, finished-work tray
☐ 10. Test: run one real week, then adjust once
What it costs: three budget tiers
A homeschool room setup has no entry fee: tier one below assumes you own a table and a lamp. What the tiers actually buy is durability and how much of the school's infrastructure, especially the movement side, you bring home. Worth knowing before you spend a dollar: depending on your state, ESA funds can cover curriculum, equipment, and PE purchases, and HSA/FSA routes exist for qualifying equipment; the current state-by-state picture is in Homeschool Grants & Funding.
| Zone | Starter · $ | Solid · $$ | Dream · $$$ |
|---|---|---|---|
| Focus | Kitchen table + bench cushion | Child desk + adjustable chair | Height-adjustable desk per worker |
| Storage | One rolling cart | Cart per child + closed cabinet | Built-in cabinets + workbox drawers |
| Lighting | Rearrange toward the window | Task lamp + reading light | Layered lamps, warm bulbs throughout |
| Movement | Cleared floor patch + a mat + break routine | Compact vertical gym (Model T3, $899) + impact mats | Full climbing gym (Spider Max V3 $1,899 / Mega Max V3 $2,399) + swing accessories + mats |
| Walls & supplies | String + clothespins, shoebox caddy | Display rail, caddy, trays | Magnetic wall rail, framed rotation, per-child stations |
Notice the pattern: the focus, storage, and lighting zones barely change between tiers, because a $40 desk and a $400 desk teach the same math. The tier that changes what a school day feels like is the movement zone, which is why families who upgrade one thing upgrade that. If you are weighing building one instead, read DIY vs. Buying an Indoor Play Gym first, and for the frame-material decision, Steel vs. Wood Climbing Gyms.
Frequently asked questions
Which room of the house is best for a homeschool room setup? The one with daylight that the family does not need between 9 and 2. In practice that beats the "obvious" candidates: a bright living-room corner outperforms a dim spare bedroom, and a basement works only after you solve lighting (Step 5) deliberately. Run the Step 1 audit on your top two candidates and the answer usually declares itself.
How long does the whole setup take? Steps 1–2 are an evening with a notepad. Steps 3–9 are a weekend for most families, assuming normal furniture assembly; our gyms are designed to go up in an afternoon. Step 10 is, by definition, a week. Plan two weekends with a school week between them and you will finish with a room built on evidence instead of guesses.
Do I need a desk for every child? One surface per simultaneous worker, not per child. Siblings on staggered schedules (one at the desk, one at the movement zone or quiet zone, then trade) share happily, and the zone system is what makes the rotation feel fair rather than imposed. Add a second desk only when two children genuinely need to write at the same time.
Is a climbing gym really a "room setup" item and is it safe indoors? It is the home version of infrastructure every school already has; the checklist treats it as Step 6, not an extra. Safety is a setup spec like any other: impact mats under climbing and landing areas, clearance from furniture edges and swing arcs, independent climbing from age 3+ with an adult nearby, and a frame that does not wobble, which is why ours pressure-fit in steel between floor and ceiling rather than balancing freestanding. Younger toddlers join hands-on only; if yours is still in the Pikler stage, here is the progression.
What if the room has to stay a guest room / dining room / office? Then the zones just have to close: cabinet doors, a docking cart, a gym in the corner the guest bed does not need. Dual-purpose rooms are the norm, not the exception, and the whole playbook for them, including apartment noise and renting, is in the small-space homeschooling guide.
We are mid-year and the room is not working. Start over? No, re-run Step 10 first: watch one week and write down where the friction actually is. Nine times out of ten it is one zone failing (usually storage overflowing or the movement zone missing), not the room, and one targeted fix beats a rebuild. The checklist is reusable; setup is never really finished, it just gets quieter.
Step 6 is the one you can't IKEA-hack.
Every gym assembles in an afternoon and is covered by a 30-day money-back guarantee.
📚 Keep reading in the Homeschool Hub
Small-Space Homeschooling: Apartments & Shared Rooms · Homeschool Room Ideas: 25 Spaces That Actually Get Used · The Brainrich Homeschool Hub
Sources
Watson, A. et al. (2017). Effect of classroom-based physical activity interventions on academic and physical activity outcomes: a systematic review and meta-analysis. International Journal of Behavioral Nutrition and Physical Activity. · Centers for Disease Control and Prevention. Physical activity guidelines for children and adolescents. · National Home Education Research Institute (2025). How many homeschool students are there in the United States?
Share: